Welcome to a tutorial about the basic of CMake! I want to introduce to you some great functionalities and a very simple example of CMakeLists, code organization and public includes!
Introduction
For this project, We will follow a "Little Kennel" project which contains three types of animals (Bunnies, Cats and Dogs)!
Those animals are provided by an external package "AnimalPackage". This package provides the animals API. "MyLittleKennel" is the executable, this one is linked to the "AnimalPackage" library. To complete this, I add an external binary, from one of my previous review, the "Multithread-glog" test. Then we have:
- One shared Library - AnimalPackage
- Two executable -
- MyLittleKennel which depends on AnimalPackage.
- Multithread-glog which is independent.
- MyLittleKennel which depends on AnimalPackage.
Shared library creation
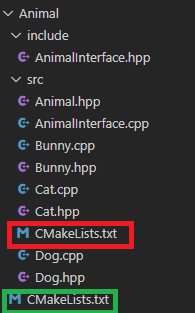
The creation of a shared library is pretty simple with CMake. I created the "AnimalPackage" module with the following file architecture:

Let's focus on the CMakeLists.txt in RED - The one which defines the build of the shared library.
cmake_minimum_required(VERSION 3.8)

set(SRCS
AnimalInterface.cpp
Bunny.cpp
Cat.cpp
Dog.cpp)

add_library(AnimalPackage SHARED ${SRCS} )

target_include_directories(AnimalPackage
PUBLIC
${CMAKE_CURRENT_SOURCE_DIR}/../include
)
- set([VariableName] [Content]) -
It is a CMake variable. I created the SRCS variable to reference all the cpp files to compile.
- set documentation - add_library([TARGET] [SHARED/STATIC/MODULE] [SOURCES LIST]) -
It declares a new TARGET defined as a Library. The [TYPE] "SHARED" gives to CMake the data that I want to create this "SHARED" library.
- add_library documentation - target_include_directories([TARGET] [PUBLIC|PRIVATE|INTERFACE]
[HEADER PATHS]) -
In my example, I give the path "Animal/include" as a header directory. The PUBLIC mark guarantees that each project which will use this TARGET will inherit of those include directories. We will see this a next chapter !
Concerning "CMAKE_CURRENT_SOURCE_DIR", this macro gives an absolute link to my current CMakeList.txt repository (the one in red !).
- target_include_directories documentation
So, this CMakeLists is defined to create a new shared library "AnimalPackages" based on the "SRCS" cpp files. Let's print the GCC instruction with the following commands to build:
cmake ..         # Generate my CMake project
make VERBOSE=1   #Build with VERBOSE = 1 to print my GCC commands generated by CMake
Now my CMake project to create my shared library is created. Now, let's link this to my binary MyLittleKennel.
Executable/Binary creation
Now let's create the executable "MyLittleKennel". I organized the CMake lists as the followings:
The "Animal" folder contains the "AnimalPackage" target created in the previous chapter.
Concerning the two CMakeLists.txt:
- The green one is what I like to name a "connector", we'll see this in the next chapter!
- The red one is used to describe how the executable "MyLittleKennel" is created. Nothing complicated here:
cmake_minimum_required(VERSION 3.8)

set(SRCS
MyLittleKennel.cpp)

add_executable(MyLittleKennel ${SRCS} )

target_link_libraries(MyLittleKennel
PRIVATE
AnimalPackage
)
- add_executable([TARGET] [SOURCES LIST]) -
It declares a new TARGET defined as an executable.
- add_executable documentation - target_link_libraries([TARGET] [SHARED/STATIC/MODULE] [LIB LIST]) -
It declares all the libraries link to my TARGET. This CMake command is powerful: Thanks to the "AnimalPackage" link, CMake can generate a build order. Then, for a "MyLittleKennel" generation, our build will start to check if the "AnimalPackage" library is available. If not, "AnimalPackage" is built before the "MyLittleKennel" linkage.
- target_link_libraries documentation
It is great! Now we have an executable defined and linked with another target (the library "AnimalPackage")...
However, something is missing:
How CMake can link the "AnimalPackage" and "MyLittleKennel" target? In this state, CMake is unable to know what is the "AnimalPackage" in the "MyLittleKennel" CMakeLists.txt. It is the point for the next chapter of this tutorial:
Link the directories. Generation of the build order
In the previous chapters, you saw some CMakeLists.txt in green rectangles. Those CMakeLists.txt are used to link the modules sub-directories to browse them successively. Now, I'll show the complete project with the last independent executable "MultithreadLog_Glog".
All those CMakeLists.txt in green boxes are "connectors" between all the project. So, if I launch a build from the root, the "Main CMakeLists.txt" is able to retrieve my complete project. Let's see the "Main CMakeLists.txt", which is similar to the other "connectors":
cmake_minimum_required(VERSION 3.8)

project(MyLittleKennelAndGlog)

add_subdirectory(CMakeExample)
add_subdirectory(Multithread-logger)
add_subdirectory will simply request to our CMakeLists.txt to find other CMakeFile.txt in this folder. add_subdirectory documentation
Now, the project is linked, let's build it from the project root !
Thanks to this work, CMake was able to construct a simple (but complete!) build order. At first, it built the "MyLittleKennel" dependency plus the independent executable "MultithreadLog_Glog". Then, when the "AnimalPackage" is completed, "MyLittleKennel" build can be launched! For the last chapter, we'll review our MyLittleKennel build instruction.
Link the targets
Do you remember the CMakeLists.txt from "MyLittleKennel"?
cmake_minimum_required(VERSION 3.8)

set(SRCS
MyLittleKennel.cpp)

add_executable(MyLittleKennel ${SRCS} )

target_link_libraries(MyLittleKennel
PRIVATE
AnimalPackage
)
Here we'll see why the "target_link_libraries" instruction is powerful and will help you to generate simple CMakeLists.txt. "MyLittleKennel" module contains a simple cpp file with the following code:
#include <AnimalInterface.hpp>
#include <iostream>

int main()
{
    AnimalInterface Bunny(AnimalInterface::BUNNY);
    AnimalInterface Cat(AnimalInterface::CAT);
    AnimalInterface Dog(AnimalInterface::DOG);

    std::cout << "The Bunny says " << Bunny.letHearThisAnimal() << std::endl;
    std::cout << "The Cat says " << Dog.letHearThisAnimal() << std::endl;
    std::cout << "The Dog says " << Cat.letHearThisAnimal() << std::endl;
}
Now, let's see the instruction generated by CMake with a "make VERBOSE=1":
cd /home/jafie/grapeProgrammer/GrapeProgrammer_ExampleCode/build/CMakeExample/MyLittleKennel && /usr/bin/c++ -I/home/jafie/grapeProgrammer/GrapeProgrammer_ExampleCode/CMakeExample/Animal/src/../include -o CMakeFiles/MyLittleKennel.dir/MyLittleKennel.cpp.o -c /home/jafie/grapeProgrammer/GrapeProgrammer_ExampleCode/CMakeExample/MyLittleKennel/MyLittleKennel.cpp
You see in bold here an extra instruction which was not present in our CMakeList.txt... An include instruction from AnimalPackage had been retrieved! It was a consequence of the "PUBLIC" instruction from "AnimalPackage", remember:
cmake_minimum_required(VERSION 3.8)

set(SRCS
AnimalInterface.cpp
Bunny.cpp
Cat.cpp
Dog.cpp)

add_library(AnimalPackage SHARED ${SRCS} )

target_include_directories(AnimalPackage
PUBLIC
${CMAKE_CURRENT_SOURCE_DIR}/../include
)
This is one of the great advantage of CMake:
Thanks to the PUBLIC mark and the "target_link_libraries", "MyLittleKennel" inherited the"AnimalPackage" includes - And only the PUBLIC part! This kind of configuration can be done with libraries too!
"MyLittleKennel" can only retrieve the "AnimalInterface" header, the others like "Bunny.hpp" and "Cat.hpp" are not accessible from "MyLittleKennel". It avoids that my executable include another header from "AnimalPackage". In concequence, all the internal header from "AnimalInterface" are PRIVATE. Let's run our binary generated by CMake!
./MyLittleKennel
The Bunny says Honk-honk
The Cat says Woof woof
The Dog says Meeeew !
Conclusion
With this kind of simple architecture, you'll be able to construct a complete project with CMake easily. More of that, CMake will generate for you a powerful build order!
I hope you liked this first tutorial! I'll complete this one with my next posts concerning CMake (and specially the usage of find_package)!

