Today, I want to introduce to you an overview of some features coming from C++20! C++20 is one of the most important C++ standard updates since C++11.
During this blog post, we will review the modules, here we go!
What is a Module in C++20?
Modules are an alternative to the “header” files. The goal of this feature is to overtake the weaknesses of “#include” instruction.
By using modules, you don’t need to link to the correct library. Instead, you will directly use an object file to gather your dependencies without using any header files!
What are the weaknesses of the current implementation?
The current header implementation is an inheritance of C.
This model has several weaknesses:
- Usage of the pre-processor to parse each header file. The compilation time increase.
- Cyclic dependencies.
- Usage of a systematic workaround: “pragma once” and “#ifdef FILE_NAME” to ensure that a double include doesn’t break the build.
- Macro re-declaration risks.
Those weaknesses can lead to different nasty bugs.
This is why Modules has been developed for the next C++20 standard! You will see that the behavior is slightly different than the current implementation.
How works modules?
For user usage, the API library access is done by using the “import” directive:
import my_module;
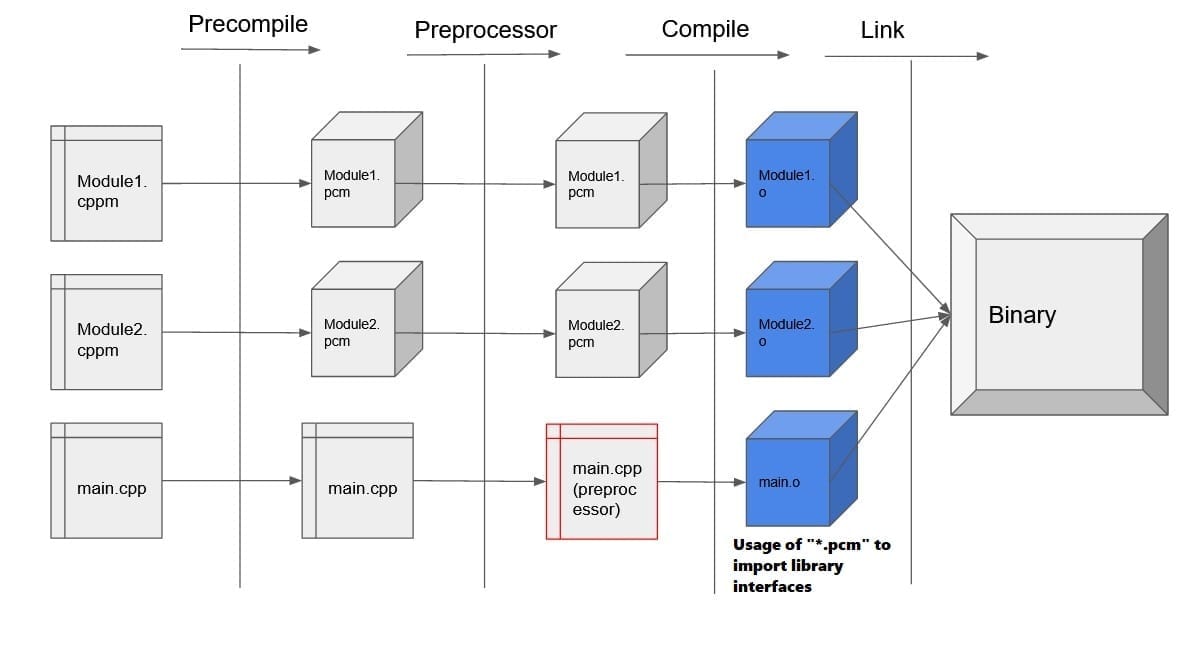
In a module, each instruction is grouped into an .o file. The code is already compiled with exposed structures, type names, functions, etc...
To avoid macro re-declaration and other strange behavior, each module is compiled as standalone. After that compilation, the module can be imported in another block. Thanks to this, only explicitly “exported APIs” can be used! Don't worry, we will see an example soon!

A basic example of module usage
Let see together a quick example of a module. Here, I will use the recommended extension for clang (“*.cppm” for a module declaration).
//@file rpg_character.cppm
#include <string>

// Module declaraction - rpg_character
export module rpg_character;

// Class declaraction. Export means that the class is an "interface" and can be used by importing the module
export class rpg_character
{
public:
    rpg_character(std::string character_name, int attack_stat, int defense_stat)
    : character_name(character_name),
    attack_stat(attack_stat),
    defense_stat(defense_stat)
    {};

    virtual ~rpg_character() {};
    std::string introduceYourself()
    {
        return std::string("Greetings, I am " + character_name + " a simple character");
    }
    std::string get_name() {return character_name;}
    int get_attack_stat() {return attack_stat;}
    int get_defense_stat() {return defense_stat;}

private:
    std::string character_name;
    int attack_stat;
    int defense_stat;
};

// Function not exported - Cannot be used in main
int get_strictly_positif_value(int value)
{
    return (value > 0 ? value : 0);
}

// Function exported
export int calculate_damages(rpg_character attacker, rpg_character target)
{
    int damage_received = attacker.get_attack_stat() - target.get_defense_stat();
    return get_strictly_positif_value(damage_received);
}
- With the instruction “export module [myModuleName]”, I declare the module.
- Then, I declares my "exportable objects" with the instruction "export ".
Now, let’s code the user of this module:
//@file main.cpp
#include <iostream>
import rpg_character;

void attack(rpg_character attacker, rpg_character target)
{
    int damage_receives = calculate_damages(attacker, target);
    std::cout << target.get_name() << " receives " << damage_receives << " damages from "  << attacker.get_name() << std::endl;
}

int main()
{
    rpg_character jose ("Jose", 5, 5);
    rpg_character baptiste ("Baptiste", 8, 2);

    std::cout << jose.introduceYourself() << std::endl;
    std::cout << baptiste.introduceYourself() << std::endl;
    attack(jose, baptiste);

    return 0;
}
As you see, instead of an “#include” I used the instruction “import”. Compared to a header file, the content of the file is not pasted during the pre-processor phase.
Now, it is time to build:
#!/bin/bash
clang++ -std=c++2a -fmodules-ts --precompile rpg_character.cppm -o rpg_character.pcm
clang++ -std=c++2a -fmodules-ts -c rpg_character.pcm -o rpg_character.o
clang++ -std=c++2a -fmodules-ts -fprebuilt-module-path=. rpg_character.o main.cpp
As you see, I built my application in three steps:
- First, We precompile “rpgCharacter.cppm” to a “.pcm” file.
- Second, We create the module object file from the "rpgCharacter.pcm" pre-compiled file.
- Then, we create the executable by compiling main.
To finish, let’s run the code!

